30. Sharing State Between React Components: Lifting State Up
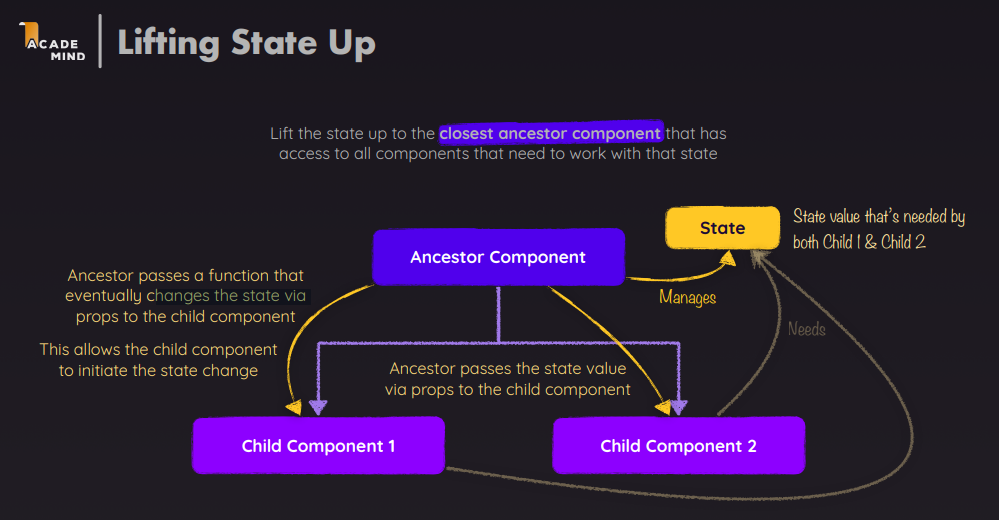
In React, components are the building blocks of a user interface. Each component can have its own state, but there are situations where multiple components need to share the same state. In such cases, the concept of “lifting state up” is used to manage the shared state in a common ancestor component.“Lifting state up” is a common pattern in React used when two or more components need to share data or state. Instead of managing the state in one of the components and creating a dependency between them, the state is “lifted up” to the closest common ancestor of the components that need the state.
Key Concept
When multiple components need to interact with the same state:
- The closest common ancestor is identified.
- The state is moved to this common ancestor.
- This ancestor manages the state and passes it down to the child components as props.
- If any child needs to modify the state, the ancestor provides a function (passed as a prop) to handle the state update.
Step-by-Step Procedure and Syntax
Identify the Closest Common Ancestor:
- Determine which component is the nearest common parent of all components that need to share the state.
Lift the State Up:
- Move the state to the identified ancestor component.
- Use the
useStatehook (or class component state) to manage the state.
const [state, setState] = useState(initialValue);Pass State Down as Props:
- Pass the state to child components that need it via props.
<ChildComponent state={state} />Create State-Modifier Functions:
- Define functions in the ancestor component to modify the state.
const modifyStateHandler = (newData) => {
  setState((prev) => ({ ...prev, newData }));
};
Pass Modifier Functions to Children:
- Pass these functions to the child components as props so they can trigger state updates.
<ChildComponent onModifyState={modifyStateHandler} />Use Props in Child Components:
- Access and use the state and modifier functions passed as props in the child components.
function ChildComponent({ state, onModifyState }) {
  return (
    <button onClick={() => onModifyState("new data")}>Modify State</button>
  );
}

Example (Sharing State/Data Between Two Child Component)
Parent Component (App.js)
The parent component will hold the shared state and provide functions for updating it. It will pass the state and update functions as props to the child components.
import React, { useState } from "react";
import ChildOne from "./ChildOne";
import ChildTwo from "./ChildTwo";

const App = () => {
  // Shared state
  const [sharedState, setSharedState] = useState("Initial State");

  // Function to update the state
  const updateState = (newState) => {
    setSharedState(newState);
  };

  return (
    <div style={{ padding: "20px", fontFamily: "Arial" }}>
      <h1>Parent Component</h1>
      <p>Shared State: {sharedState}</p>
      <hr />
      <ChildOne sharedState={sharedState} updateState={updateState} />
      <hr />
      <ChildTwo sharedState={sharedState} updateState={updateState} />
    </div>
  );
};

export default App;
Child Component 1 (ChildOne.js)
This component will display the shared state and allow the user to modify it through an input field.
import React from "react";

const ChildOne = ({ sharedState, updateState }) => {
  const handleChange = (e) => {
    updateState(e.target.value);
  };

  return (
    <div>
      <h2>Child Component One</h2>
      <p>Shared State: {sharedState}</p>
      <input
        type="text"
        value={sharedState}
        onChange={handleChange}
        placeholder="Update State"
      />
    </div>
  );
};

export default ChildOne;
Child Component 2 (ChildTwo.js)
This component will display the shared state and provide a button to reset it.
import React from "react";

import React from "react";

const ChildTwo = ({ sharedState, updateState }) => {
  const handleReset = () => {
    updateState("Initial State");
  };

  return (
    <div>
      <h2>Child Component Two</h2>
      <p>Shared State: {sharedState}</p>
      <button onClick={handleReset}>Reset State</button>
    </div>
  );
};

export default ChildTwo;
Folder Structure
src/
├── App.js
├── ChildOne.js
├── ChildTwo.js
├── index.js
Explanation:
- The
Appcomponent is the parent component that holds the shared state and passes it down toChildOneandChildTwo. ChildOneandChildTwoare child components that receive the shared state and update functions as props.ChildOneallows the user to update the shared state through an input field, whileChildTwoprovides a button to reset the state.
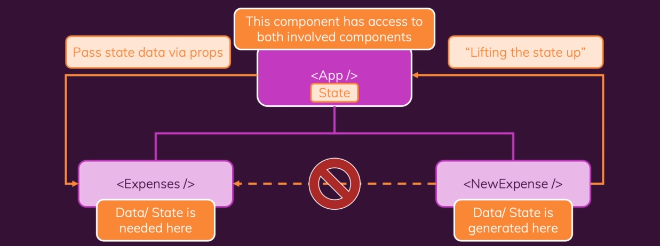
Note: We cant directly pass data from one child component to another child component. We need to pass the data to the parent component and then pass it to the other child component. This is called lifting state up.
Example (Sharing State/Data Between Two Sibling Components)

Parent Component (App.js)
import {usState} from 'react';
import Expenses from './Expenses';
import NewExpense from './NewExpense';
const App=()=>{
    const [expenses,setExpenses]=useState([
        {id:1,title:'Car Insurance',amount:294.67,date:new Date(2021,2,28)},
        {id:2,title:'Health Insurance',amount:394.67,date:new Date(2021,3,28)},
        {id:3,title:'Home Insurance',amount:494.67,date:new Date(2021,4,28)},
    ]);

    const addExpenseHandler=(expense)=>{
        setExpenses((prevExpenses)=>{
        return [expense,...prevExpenses];
        });
    };

    return (
        <div>
        <NewExpense onAddExpense={addExpenseHandler}/>
        <Expenses items={expenses}/>
        </div>
    );
};

export default App;
NewExpense Component
import ExpenseForm from './ExpenseForm';
const NewExpense=(props)=>{
    const saveExpenseDataHandler=(enteredExpenseData)=>{
        const expenseData={
            ...enteredExpenseData,
            id:Math.random().toString()
        };
        props.onAddExpense(expenseData);
    };
    return (
        <div>
        <ExpenseForm onSaveExpenseData={saveExpenseDataHandler}/>
        </div>
    );
};

export default NewExpense;
Expenses
function Expenses({iteam}){
    return (
        <>
        {items.map((expense)=>(
            <div>
            <h2>{expense.title}</h2>
            <div>{expense.amount}</div>
            <div>{expense.date.toISOString()}</div>
            </div>
        ))}
        </div>
    )
}
31. Dynamically setting object keys
In JavaScript, object keys are usually set statically, but there are situations where you may need to set object keys dynamically based on some conditions or variables. This can be achieved using the square bracket notation ([]) to set object keys dynamically.
for example:
const data="name";
const person={
    [data]:'John'
};

console.log(person); // {name:'John'}
If we dont use square bracket notation, then the key will be set as ‘data’ instead of ’name’.
const data="name";
const person={
    data:'John'
};

console.log(person); // {data:'John'}
32.Using SAme State Variable to store multiple values
=> We can use the same state variable to store multiple values by using an object.
const [userInput,setUserInput]=useState({
    enteredTitle:'',
    enteredAmount:'',
    enteredDate:''
});

const titleChangeHandler=(event)=>{
    setUserInput({
        ...userInput,
        enteredTitle:event.target.value
    });
};

const amountChangeHandler=(event)=>{
    setUserInput({
        ...userInput,
        enteredAmount:event.target.value
    });
};

const dateChangeHandler=(event)=>{
    setUserInput({
        ...userInput,
        enteredDate:event.target.value
    });
};

return (

    <div>
    Title:<input type="text" value={userInput.enteredTitle} onChange={titleChangeHandler}/>
    Amount:<input type="number" value={userInput.enteredAmount} onChange={amountChangeHandler}/>
    Date:<input type="date" value={userInput.enteredDate} onChange={dateChangeHandler}/>

    The entered title is {userInput.enteredTitle}
    The entered amount is {userInput.enteredAmount}
    The entered date is {userInput.enteredDate}

    </div>
);
=> In the above code, we are using the same state variable userInput to store multiple values. We are using an object to store the values. We are using the spread operator to copy the existing values of the object and then updating the required value.
33.Handeling page reloads when a form is submitted
- When a form is submitted, the page reloads by default. This is not what we want in a single page application. We want to stay on the same page and update the content of the page. We can do this by using the
preventDefault()method on the event object. - The
preventDefault()method prevents the default behavior of the event object. In this case, it prevents the page from reloading when the form is submitted.
const submitHandler=(event)=>{
    event.preventDefault();
    // code to handle form submission
};