38. Understanding the Concept of Prop Drilling
Prop drilling refers to the process of passing data from a parent component to a deeply nested child component through all the intermediate components, even if those intermediate components don’t need the data themselves. Let’s break this down with an example.
Component Tree
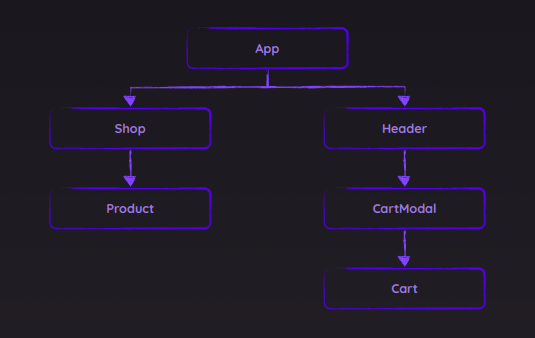
Imagine the following component hierarchy:

Now, suppose we want to transfer some data from the Product component to the Cart component. Since Product and Cart are in separate branches of the component tree, they don’t have a direct connection.
How Prop Drilling Works
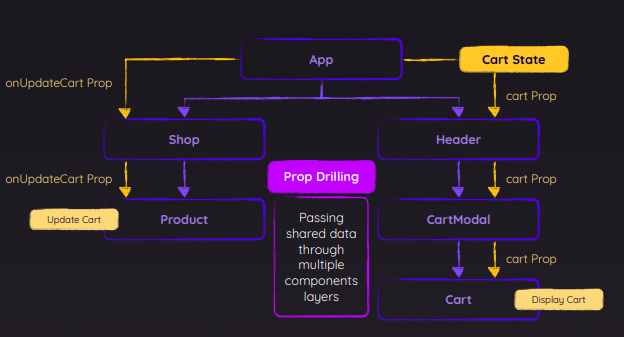
To make this work, we need to store the shared state in a common ancestor, which is the App component in this case. Then, we have to pass the state down through all the intermediate components, even if those components don’t actually use the data.
Here’s a visual representation of this:
- Data flows from Product → Shop → App (common ancestor).
- The data then flows from App → Header → CardModel → Cart.

This creates a lot of unnecessary overhead because the intermediate components (Shop, Header, and CardModel) don’t need the data but still have to handle it.
Prop drilling can quickly become cumbersome in large applications with deeply nested components. To solve this, we can use state management tools like Redux, Context API, or React Query, which allow us to manage and share state more effectively without passing it through every component.
39. Introduction to React Context API
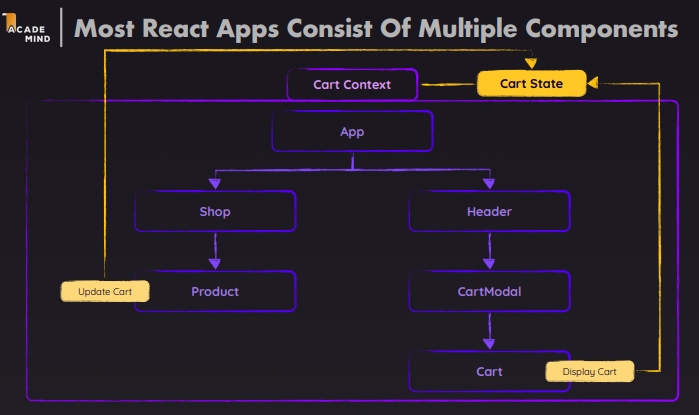
Context API is a feature in React that allows you to share data between components without having to pass props down manually at every level. It provides a way to pass data through the component tree without having to pass props down manually at every level as shown in the image below.

How to use context API
- Create a context using the
createContextfunction.
import { createContext } from 'react';
const CartContext = createContext();
export default CartContext;
- Wrap the parent component with the
Providercomponent.
- Which Component to wrap?
- Wrap to the common ancestor of the components that need the context data.
- In the example below, we wrap the
Appcomponent with theProvidercomponent.
For Example:
import CartContext from './store/CartContext';
function App() {
  return (
    <CartContext.Provider value={data}>
      <Product />
      <Shop />
    </CartContext.Provider>
  );
}
Explaination:Since we want to share the product Component data with the Cart Component SO in order to do that we wrap the first common ancestor of the Product and Cart Component i.e App Component with the Provider Component and pass the data to the value prop of the Provider Component.
- Access the context data in the child component using the
useContexthook.
for example:
import { useContext } from 'react';
import CartContext from '../store/CartContext';
function Cart() {
  const cartCtx = useContext(CartContext);
  return (
    <div>
      <h1>Cart</h1>
    {cartCtx.products.map(product => (
      <p key={product.id}>{product.name}</p>
    ))}
    </div>
  );
}
- What Whappen when the data is updated?
- When the data is updated in the Provider component, all the child components that are using the context data will be re-rendered automatically.
Task: Design a simple application that has a component called App. App has two child components: Header and Shop. Header has one child, CartModel, and Shop has one child, Product. Pass the data from the Product component to the CartModel component using the Context API.
Structure of the project
src
|_components
    |_App
        |_App.js
    |_Header
        |_Header.js
        |_CartModel.js
    |_Shop
        |_Shop.js
        |_Product.js
|_store
    |_CartContext.js
CartContext.js
import { createContext } from 'react';
const CartContext = createContext();
export default CartContext;
App.js
import CartContext from '../store/CartContext';
import Header from '../Header/Header';
import Shop from '../Shop/Shop';
import { useState } from 'react';
function App() {
  const [cartProducts, setCartProducts] = useState([]);
    const addProductToCart = (product) => {
        setCartProducts((prevProducts) => [...prevProducts, product]);
    };
  return (
    <CartContext.Provider value={ {
        products: cartProducts,
        addProduct: addProductToCart
        } }>
      <Header />
      <Shop />
    </CartContext.Provider>
  );
}
export default App;
Header.js
import CartModel from './CartModel';
function Header() {
  return (
    <div>
      <h1>Header</h1>
      <CartModel />
    </div>
  );
}
export default Header;
CartModel.js
import { useContext } from 'react';
import CartContext from '../../store/CartContext';
function CartModel() {
  const cartCtx = useContext(CartContext);
  return (
    <div>
      <h1>CartModel</h1>
      {cartCtx.products.map(product => (
        <p key={product.id}>{product.name}</p>
      ))}
    </div>
  );
}
export default CartModel;
Shop.js
import Product from './Product';
function Shop() {
  return (
    <div>
      <h1>Shop</h1>
      <Product />
    </div>
  );
}
export default Shop;
Product.js
import { useContext } from 'react';
import CartContext from '../../store/CartContext';
function Product() {
  const cartCtx = useContext(CartContext);
  const product = {
    id: 1,
    name: 'Laptop'
  };
  return (
    <div>
      <h1>Product</h1>
      <button onClick={() => cartCtx.addProduct(product)}>Add to Cart</button>
    </div>
  );
}
export default Product;
Outsoursing the Context Provider
Since all the logic related to the context is in the App Component so we can outsource the context provider and its logic to a separate component in order to make the App Component more clean and readable.
CartContext.js
import { createContext, useState } from 'react';
const CartContext = createContext();

export const CartContextProvider = (props) => {
    const [cartProducts, setCartProducts] = useState([]);
    const addProductToCart = (product) => {
        setCartProducts((prevProducts) => [...prevProducts, product]);
    };
    const context = {
        products: cartProducts,
        addProduct: addProductToCart
    };
    return (
        <CartContext.Provider value={context}>
            {props.children}
        </CartContext.Provider>
    );
};
App.js
import Header from '../Header/Header';
import Shop from '../Shop/Shop';
import { CartContextProvider } from '../store/CartContext';

function App() {
  return (
    <CartContextProvider>
      <Header />
      <Shop />
    </CartContextProvider>
  );
}
export default App;
Other Components remain the same.
39.UseReducer Hook in React
USe reducer is a hook that is used for state management in React. It is an alternative to useState. It is usually preferable when you have complex state logic that involves multiple sub-values or when the next state depends on the previous one.
How to use useReducer Hook
- Create a reducer function.
A reducer function is a function that takes the current state and an action as arguments and returns a new state based on the action type.action .
action:It contains the object that is sent by the dispatch function.
For Example:
const counterReducer = (state, action) => {
  if (action.type === 'INCREMENT') {
    return { counter: state.counter + 1 };
  }
  if (action.type === 'DECREMENT') {
    return { counter: state.counter - 1 };
  }
  return state;
};
Here, the reducer function takes two arguments: state and action. It checks the action type and returns a new state based on the action type.
- Use the useReducer hook in the component. The useReducer hook takes two arguments: the reducer function and the initial state and returns the current state and a dispatch function as an array which is shown below. For Example:
import { useReducer } from 'react';
const [counterState, dispatchCounter] = useReducer(counterReducer, { counter: 0 });
Here, counterState is the current state and dispatchCounter is the dispatch function that is used to dispatch an action to the reducer function and { counter: 0 } is the initial state such that the counter is initialized to 0.
- Dispatch an action to the reducer function. To dispatch an action to the reducer function, you need to call the dispatch function with an object that contains the action type and any additional data that is required by the reducer function. For Example:
dispatchCounter({ type: 'INCREMENT' });
To change the state, you need to call the dispatch function with an object that contains the action type.Here, the action type is ‘INCREMENT’ which increments the counter by 1.
Task: Design a simple counter application that has a component called Counter. The Counter component has two buttons: Increment and Decrement. Use the useReducer hook to manage the state of the counter.
Structure of the project
src
|_components
    |_Counter
        |_Counter.js
Counter.js
import { useReducer } from 'react';
const counterReducer = (state, action) => {
  if (action.type === 'INCREMENT') {
    return { counter: state.counter + 1 };
  }
  if (action.type === 'DECREMENT') {
    return { counter: state.counter - 1 };
  }
  return state;
};

function Counter() {
  const [counterState, dispatchCounter] = useReducer(counterReducer, { counter: 0 });

  const handleIncrement = () => {
    dispatchCounter({ type: 'INCREMENT' });
  };

  const handleDecrement = () => {
    dispatchCounter({ type: 'DECREMENT' });
  };

  return (
    <div>
      <h1>Counter</h1>
      <p>{counterState.counter}</p>
      <button onClick={handleIncrement}>Increment</button>
      <button onClick={handleDecrement}>Decrement</button>
    </div>
  );
}
If we use useState hook then the code will be like this:
import { useState } from 'react';
function Counter() {
  const [counter, setCounter] = useState(0);

  const handleIncrement = () => {
    setCounter(counter=>counter + 1);
  };

  const handleDecrement = () => {
    setCounter(counter=>counter - 1);
  };

  return (
    <div>
      <h1>Counter</h1>
      <p>{counter}</p>
      <button onClick={handleIncrement}>Increment</button>
      <button onClick={handleDecrement}>Decrement</button>
    </div>
  );
}
What is the difference between useState and useReducer?
- useState is a simple and straightforward way to manage state in React. It is suitable for managing simple state logic.
- useReducer is more powerful and flexible than useState. It is suitable for managing complex state logic that involves multiple sub-values or when the next state depends on the previous one.
Looking the example case Scenario: Here using reducer we write all the logic in a single function and then we dispatch the action to the reducer function and then the reducer function returns the new state based on the action type. This makes the code more readable and maintainable.
but in the case of useState, we have to write the logic for each state change separately which makes the code more complex and difficult to maintain.
Note: Always change in state variable will cause the re-rendering of the component.